Remap Any Key
in Seconds
KeyTweak lets you reassign, disable, or customize any key on your keyboard without touching the Registry. Simple interface, instant results, completely free.
What Is KeyTweak?
A simple, no-fuss utility that lets any Windows user remap or disable keyboard keys without touching the registry manually.
KeyTweak is a free Windows utility that gives you direct control over how every key on your keyboard behaves. Whether you want to disable the Caps Lock key, swap the Windows key with something more useful, or fix a physically broken key by mapping it to another position, KeyTweak handles it through a clean visual interface — no registry editing required.
The software was written by Travis Krumsick and released under a Simplified BSD License, making it completely free for personal and commercial use. It works by writing a Scancode Map entry to the Windows registry at HKEY_LOCAL_MACHINE\SYSTEM\CurrentControlSet\Control\Keyboard Layout, which Windows reads at boot time. The result is a persistent remapping that survives restarts and works at the hardware level — before any application sees the keypress.
Who Actually Uses This?
The most popular use case by far is disabling Caps Lock. It is one of the oldest topics on keyboard customization forums, and KeyTweak is consistently the tool people recommend for doing it in under two minutes. Beyond that, programmers often remap Caps Lock to Left Ctrl for ergonomic reasons, gamers reassign keys they never use, and users with partially failed keyboards map dead keys to working alternatives.
KeyTweak also appeals to accessibility users. Someone typing with one hand, for example, can rearrange keys to put the most-used characters within easy reach — all without buying specialized hardware or installing complex drivers.
How the Virtual Keyboard Works
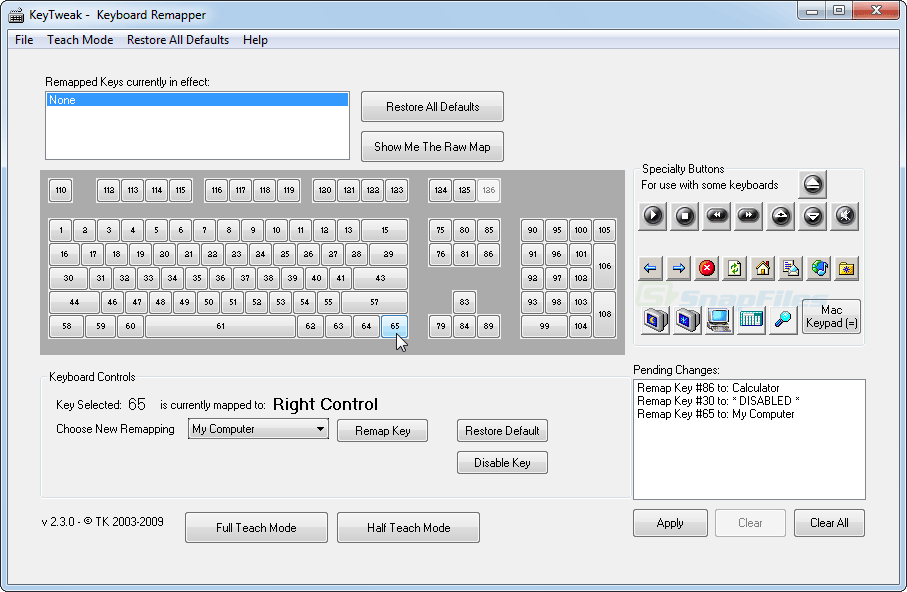
The main window shows a numbered keyboard diagram with 126 key positions. Click any key to select it, then choose the target function from a dropdown on the left sidebar. A “Keyboard Controls” panel lets you pick what the selected key should become, while a separate “Specialty Buttons” panel covers media keys, volume controls, email shortcuts, and similar function keys that sit outside the standard layout.
Once you apply changes, KeyTweak adds them to a “Current Remappings” list at the bottom of the window. You can undo the last remap, restore all keys to factory defaults, or save your remap configuration as a file to reuse on another machine.
Stable, Lightweight, and Still Relevant
KeyTweak version 2.3.0 was released in 2009, and the codebase has not needed significant updates since then — Windows’ Scancode Map mechanism has not changed. The installer is 280 KB, smaller than most web pages. It runs on every version of Windows from XP through Windows 11, both 32-bit and 64-bit. While Microsoft’s PowerToys now includes a Keyboard Manager module with a more modern interface, KeyTweak remains widely recommended for users who want something minimal without the overhead of the full PowerToys suite.
Quick Facts
Key Features
Everything KeyTweak does, from basic remapping to specialty key control — here is what makes it one of the most recommended free keyboard utilities on Windows.
Visual Keyboard Interface
KeyTweak displays a full virtual keyboard with 126 numbered key positions — every key shown exactly where it sits on a physical board. Click any key to select it for remapping. The numbered layout handles international keyboards and unusual hardware that may not match the default labels, so you can always find the right key regardless of your locale settings.
Key Remapping
Reassign any key to produce a completely different keystroke. Select the source key on the visual keyboard, then choose the target function from the dropdown — covering letters, numbers, modifiers, function keys, and more. Changes are written to the Windows Scancode Map, which means they apply system-wide, in every application, from the moment Windows loads. No per-app configuration needed.
Disable Any Key
Set any key to “Disable” so that pressing it does nothing at all. This is the fastest way to silence Caps Lock, prevent accidental presses of the Windows key during gaming, or neutralize the Insert key that so many users find more annoying than useful. Disabled keys are listed in the Current Remappings panel so you always know what you have switched off.
Full Teach Mode
Instead of hunting through the numbered keyboard layout, activate Full Teach Mode and simply press the physical key you want to remap. KeyTweak detects the scancode automatically, highlights the corresponding key in the diagram, and adds it to the remap queue. This is especially helpful for identifying non-standard keys on gaming keyboards, multimedia remotes, or compact layouts that do not match the standard diagram positions.
Half Teach Mode
Half Teach Mode offers a middle ground between manual selection and full key detection. Press the physical source key to identify it automatically, then select the target mapping from the dropdown. This workflow is quicker than clicking through a 126-key diagram and more controlled than Full Teach Mode when you know exactly what you want the key to do but are unsure which number it is in the diagram.
Specialty / Media Key Support
The Specialty Buttons panel handles keys that sit outside the standard 104-key layout: Volume Up, Volume Down, Mute, Play/Pause, Stop, Next Track, Previous Track, Email, Home, Search, Favorites, and Power keys. These can be remapped or disabled just like regular keys. If your keyboard has buttons you have never used, this panel lets you assign them to something that actually fits your workflow.
One-Click Restore Defaults
The “Restore All Defaults” button wipes every custom remap and returns your keyboard to its original state. No hunting through a list to undo individual mappings — one click clears the Scancode Map entry entirely. After a system restart, your keyboard behaves exactly as it did out of the box. This is the fastest recovery option if a remap causes unexpected behavior or you switch to a different keyboard layout.
Undo Last Remap
Made a mistake on the last mapping? The Undo Last Remap button reverses only the most recent change without touching the rest of your configuration. This is useful when testing multiple remappings in sequence — you can step back one change at a time rather than wiping everything and starting over. Combined with the Current Remappings list, it gives you a clear audit trail of every active modification.
Save and Load Remap Files
Export your current remap configuration to a file and reload it later — handy when reinstalling Windows, setting up a new machine, or sharing a configuration with someone else. The file captures every active remap so you do not have to manually re-enter your settings. Load it back on any Windows PC running KeyTweak and your keyboard will behave identically within seconds of applying the settings and rebooting.
Minimal Footprint
KeyTweak is 280 KB installed — roughly the size of a small JPEG image. It does not run in the background after you apply remappings, because changes are written to the registry and handled by Windows itself at boot time. No tray icon, no startup entry, no background service. This approach also means there are no compatibility issues with other keyboard software, as KeyTweak is not intercepting keypresses at runtime.
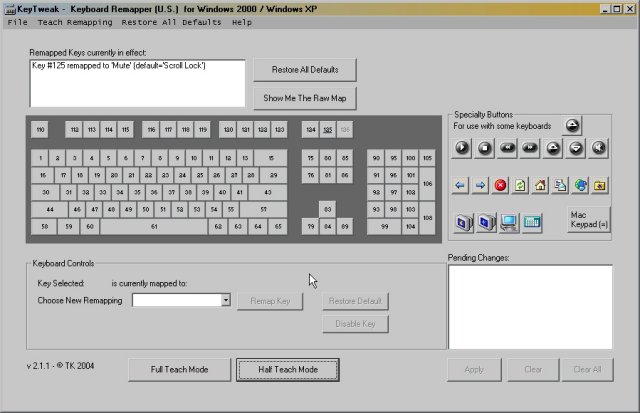
Raw Map View
For users who want to inspect exactly what is written to the registry, KeyTweak’s Raw Map view shows the Scancode Map binary data in a readable table. This is not needed for typical use, but it is useful for troubleshooting conflicts with other mapping tools, verifying that your changes were applied correctly, or understanding how Windows processes scancode remapping at a technical level.
System Requirements
KeyTweak is one of the lightest keyboard utilities available. If your PC can run Windows, it can run KeyTweak.
| Component | Minimum | Recommended |
|---|---|---|
| Operating System | Windows XP (32-bit or 64-bit) | Windows 10 or Windows 11 (64-bit) |
| Processor (CPU) | Any x86 or x64 CPU supported by Windows XP | Any modern CPU — no minimum speed |
| RAM | 256 MB (Windows XP minimum) | No specific requirement — uses under 5 MB at runtime |
| Disk Space | 1 MB free space | 1 MB free space (installer is 280 KB) |
| Display | 800 x 600 resolution | 1024 x 768 or higher for best layout |
| Permissions | Administrator account required | Administrator account required |
| Internet Connection | Not required after download | Not required — fully offline |
| Additional Software | None — no drivers or runtimes needed | None — standalone application |
HKEY_LOCAL_MACHINE\SYSTEM\CurrentControlSet\Control\Keyboard Layout) exists on all supported Windows versions. A system restart is required after applying any remap for changes to take effect.
Download KeyTweak
Free, safe, and just 280 KB. Download the official KeyTweak installer for Windows below.
KeyTweak_install.exe). Run it, follow the two-step install wizard, and launch the app from your Start menu. No account, no registration, and no internet connection required after download. The application writes remappings to the Windows registry only when you click “Apply” — nothing happens in the background. Changes take effect after a single restart. See the Getting Started guide for full setup instructions.
Screenshots
See KeyTweak’s interface in action — the virtual keyboard layout, remapping controls, and specialty key panel.
Getting Started with KeyTweak
From download to your first key remap in under five minutes. Follow these steps to set up KeyTweak and start customizing your keyboard.
Downloading KeyTweak
Head to the Download section on this page and click the “Download KeyTweak” button. The download links to the official KeyTweak_install.exe installer file hosted on BleepingComputer, one of the most trusted software repositories for Windows tools. The file is 280 KB and downloads in under a second on any modern connection.
KeyTweak is a 32-bit application that runs on both 32-bit and 64-bit versions of Windows. You do not need to choose between versions — the single installer works on everything from Windows XP through Windows 11. There is no 64-bit specific build because KeyTweak interfaces with the Windows registry directly, and 32-bit registry writes from WOW64 are redirected automatically on 64-bit Windows.
There is no portable or ZIP-only version of KeyTweak — the installer is the only official distribution format. The install process is short (two screens) and does not bundle any third-party software.
Installation Walkthrough
Double-click the downloaded KeyTweak_install.exe file to start the installer. On Windows 10 and 11, you may see a Windows SmartScreen warning that says “Windows protected your PC.” This appears because KeyTweak predates Microsoft’s code-signing requirements for SmartScreen bypass. Click “More info” and then “Run anyway” to proceed.
Program Files and a Start Menu shortcut — nothing else is modified until you actually apply a remap inside the app.
The installer has two steps:
- A welcome screen with the BSD license text. Click “Next.”
- The installation directory selection. The default is
C:\Program Files\KeyTweak\— leave it as is unless you have a specific reason to change it. Click “Install.”
Installation takes under five seconds. The installer creates a Start Menu entry and optionally a desktop shortcut. After completion, you can launch KeyTweak directly from the installer’s final screen or from the Start Menu.
No reboot is required to install the application — a reboot is only needed after you apply your first key remap inside the software.
Initial Setup and Interface Tour
When KeyTweak launches, the main window shows a full keyboard diagram taking up most of the screen. Here is what each area does:
- Virtual keyboard (center): A diagram of a standard 104-key layout with every key numbered 1 through 126. Click any key here to select it for remapping. The selected key highlights in blue.
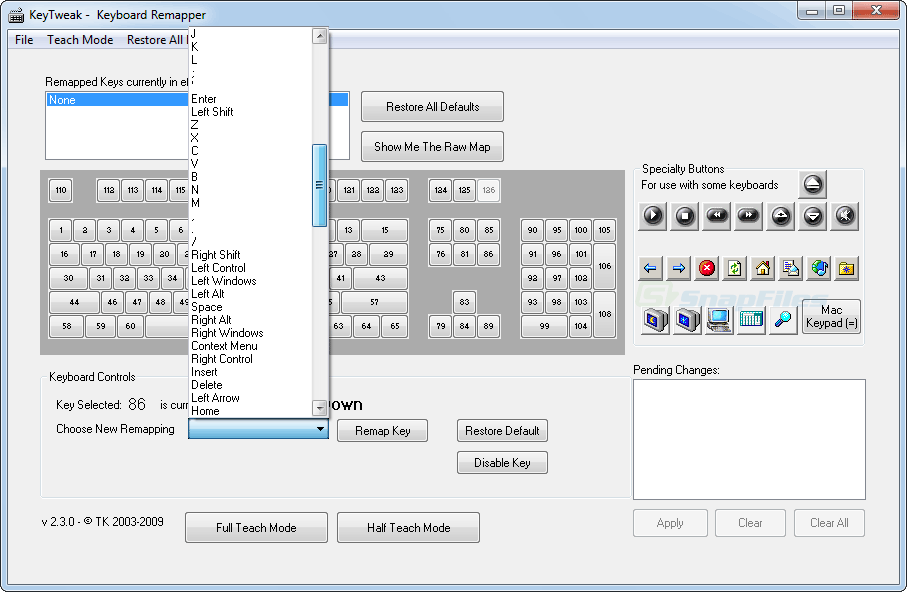
- Keyboard Controls (bottom-left): Shows the currently selected key and a dropdown where you choose what that key should do. The dropdown lists every possible key, plus a “Disable Key” option at the top.
- Specialty Buttons (bottom-right): Handles media keys and function keys not shown on the main diagram — Volume, Play/Pause, Email, Home, and similar.
- Current Remappings (bottom panel): Lists every active remap that has been written to the registry. This persists across sessions and shows exactly what your keyboard is currently set to do.
There are no settings to configure on first launch — KeyTweak reads the existing registry state and displays any active remaps immediately. If your keyboard has never been remapped, the Current Remappings list will be empty.
Your First Key Remap
Let’s walk through the most common use case: remapping Caps Lock to Left Ctrl. This is a popular choice among programmers and touch typists because Ctrl is used constantly for shortcuts, while Caps Lock is almost never needed.
- In the virtual keyboard diagram, look for key number 30 in the bottom-left area — this is Caps Lock. Click it. The key highlights, and the “Keyboard Controls” panel at the bottom shows “Key 30 Selected.”
- In the “Choose New Remapping” dropdown inside the Keyboard Controls panel, scroll to find “Left Ctrl.” Select it.
- Click the “Remap Key” button in the Keyboard Controls panel. KeyTweak adds the change to the Current Remappings list at the bottom of the screen but does not write it yet.
- Click “Apply” (the button at the bottom of the window) to write all pending remaps to the registry.
- KeyTweak will prompt you to restart your computer. Click OK — the remap will not take effect until Windows loads the Scancode Map from the registry at startup.
- After restarting, your Caps Lock key now produces a Left Ctrl keypress in every application.
To disable a key entirely (like Caps Lock, Insert, or the right Windows key), follow the same steps but select “Disable Key” from the top of the “Choose New Remapping” dropdown instead of a key name.
Common Remap Ideas
| Original Key | Remapped To | Use Case |
|---|---|---|
| Caps Lock | Left Ctrl | Programmer / typist ergonomics |
| Caps Lock | Escape | Vim users — faster mode switching |
| Insert | Disabled | Stop accidental overwrite mode |
| Right Windows | Disabled | Prevent gaming interruptions |
| Scroll Lock | Num Lock | Reassign a never-used key |
| F12 | Print Screen | Easier screenshot access |
Tips, Tricks, and Best Practices
A few things that trip up new users and some tricks that experienced users rely on:
- Always restart after applying: KeyTweak writes to
HKEY_LOCAL_MACHINE, which Windows reads only at boot time. If your remap does not seem to work after clicking Apply, you have not restarted yet. - Check Current Remappings before adding new ones: If you have multiple remaps applied from different sessions, the list tells you exactly what is active. This prevents confusion when a key behaves unexpectedly.
- Restore All Defaults is safe: If something goes wrong, “Restore All Defaults” then restart returns your keyboard to factory state. You lose all custom remaps, but nothing permanent happens to your Windows install.
- Save your config first: Use File > Save to export your remap file before major Windows updates or reinstalls. Reload it with File > Load after reinstalling KeyTweak.
- Admin rights required: KeyTweak needs an administrator account because it writes to
HKLM(the machine-wide registry hive). Standard user accounts cannot remap keys with this method.
If you need more than simple one-to-one remapping — like triggering macros, remapping key combinations, or scripting complex key sequences — KeyTweak is not the right tool for that. AutoHotkey handles that use case. But for straightforward physical key reassignment with no overhead and no ongoing process running, KeyTweak is the cleanest solution available.
For help beyond this guide, the KeyTweak thread on BleepingComputer’s forums has been active since the software’s release and covers most edge cases. The software itself has no official support forum, but community answers are comprehensive given how simple the utility’s scope is.
Frequently Asked Questions
Real questions from users about KeyTweak — covering safety, compatibility, troubleshooting, and everything in between.
Is KeyTweak free to download and use?
Yes, KeyTweak is completely free. It is released under the Simplified BSD License, which permits free use for personal and commercial purposes without restrictions or payment. There is no premium version, no feature lock, and no subscription — every feature in the application is available to every user at no cost.
The freeware status has not changed since the software’s initial release. Travis Krumsick made KeyTweak available as an open utility, and the BSD license means you can even redistribute it or include it in software packages without asking permission, as long as you include the original license notice.
Pro tip: Because KeyTweak is genuinely free with no monetization, the download page does not have “Free Download” buttons that lead to paid wrappers or download managers. Click the download button on our download section and you get the real installer directly.
Is KeyTweak safe for Windows 10 and Windows 11?
Yes, KeyTweak is safe. The application modifies only one registry value — the Scancode Map entry under HKEY_LOCAL_MACHINE\SYSTEM\CurrentControlSet\Control\Keyboard Layout — which is the standard Windows mechanism for keyboard remapping. It does not install drivers, does not run background processes, and does not connect to the internet.
KeyTweak has been distributed on BleepingComputer since 2009 and scanned regularly by antivirus engines through VirusTotal with clean results. Some scanners flag it as a “potentially unwanted program” because it modifies the registry, but this is a heuristic false positive — the same class of warning that applies to any legitimate registry utility.
On Windows 10 and 11, you may see a SmartScreen warning when running the installer because KeyTweak predates Microsoft’s modern code-signing certification system and the executable does not carry a publisher signature. This is normal for older freeware utilities.
- To bypass SmartScreen: click “More info” then “Run anyway”
- To verify the file: upload
KeyTweak_install.exeto virustotal.com before running - Confirmed working on Windows 11 22H2 and 23H2 as of 2025
Pro tip: The registry change KeyTweak makes is entirely reversible. “Restore All Defaults” + restart removes it completely. Nothing about the install or remap is permanent if you decide to undo it.
Does KeyTweak work on Windows 11?
Yes, KeyTweak works on Windows 11. The Scancode Map registry mechanism that KeyTweak uses has been part of Windows since NT 4.0 and remains fully supported in Windows 11. Users have confirmed compatibility on Windows 11 Home, Pro, and Enterprise editions, including both the original release and subsequent updates through 23H2.
The application was built for Windows XP, so the interface looks dated by modern standards — but it runs without issues. Windows 11 includes compatibility layers for older Win32 applications, and KeyTweak’s minimal system footprint (no services, no COM objects, no kernel components) means there are no compatibility layers needed. It runs as a straightforward 32-bit process under WOW64.
The one caveat: Windows SmartScreen will warn you about the installer because the executable is not signed with a modern certificate. See the safety FAQ entry above for how to handle that warning.
Pro tip: If you are on Windows 11 and want a more modern interface for the same functionality, Microsoft PowerToys includes a Keyboard Manager module. But if you want something small and standalone that does not require the full PowerToys suite, KeyTweak still works perfectly.
Learn more about KeyTweak’s capabilities in the Key Features section.
What are the system requirements for KeyTweak?
KeyTweak has extremely low system requirements because it is a simple GUI utility written in the early 2000s. If your PC can run Windows, it can run KeyTweak without any issue.
- Operating System: Windows XP, Vista, 7, 8, 8.1, 10, or 11 (32-bit or 64-bit)
- Processor: Any CPU that Windows supports — no minimum speed requirement
- RAM: Under 5 MB used at runtime. No practical minimum beyond what Windows itself needs.
- Disk Space: The installer is 280 KB. Installed files total under 1 MB.
- Permissions: Administrator account required to write to HKEY_LOCAL_MACHINE
- Internet: Not required. KeyTweak is fully offline.
- Additional Software: None. No .NET Framework, no Visual C++ Redistributable, no Java.
Pro tip: Even on a 10-year-old PC running Windows 7, KeyTweak loads in under one second and uses effectively zero CPU while open. The performance requirements are entirely non-existent for modern hardware.
For a full breakdown, see the System Requirements table on this page.
How do I remap a key using KeyTweak?
Remapping a key in KeyTweak takes about 30 seconds once the app is open. Here is the full process:
- Launch KeyTweak from the Start Menu or desktop shortcut.
- In the virtual keyboard diagram, click the key you want to change. It highlights to confirm selection.
- In the “Keyboard Controls” panel (bottom-left), find the “Choose New Remapping” dropdown. Click it and select what you want the key to produce instead — or choose “Disable Key” to silence it.
- Click “Remap Key” in the Keyboard Controls panel. The change appears in the “Current Remappings” list.
- Click “Apply” at the bottom of the window to write the remap to the Windows registry.
- Restart your computer. The remap takes effect on the next boot.
If you are not sure which key number to click, use Teach Mode: click “Full Teach Mode,” then press the physical key on your keyboard. KeyTweak identifies it automatically and highlights it in the diagram.
Pro tip: You can apply multiple remaps in one session before clicking Apply. Add all the changes you want to the list, then click Apply once and restart once. This is faster than applying and restarting for each key individually.
See the Getting Started guide for a complete walkthrough with screenshots.
How do I disable Caps Lock with KeyTweak?
Disabling Caps Lock is the single most common use case for KeyTweak, and it takes about 30 seconds. Open KeyTweak, click the Caps Lock key in the virtual keyboard diagram (it is in the left section of the second-to-bottom row), then in the Keyboard Controls panel choose “Disable Key” from the “Choose New Remapping” dropdown. Click “Remap Key,” then “Apply,” then restart your computer. After the restart, pressing the physical Caps Lock key does nothing.
If you want Caps Lock to do something useful instead of just being silent, pick any key from the dropdown instead of “Disable Key.” Popular choices are Left Ctrl (for programmers and typists), Escape (for Vim users), or Backspace (for compact keyboard users).
- Caps Lock to Left Ctrl: select “Left Ctrl” in the dropdown
- Caps Lock disabled: select “Disable Key” in the dropdown
- Caps Lock to Escape: select “Escape” in the dropdown
Pro tip: To reverse the change at any time, open KeyTweak and click “Restore All Defaults” (or find Caps Lock in the Current Remappings list and undo that specific entry). Restart, and Caps Lock behaves normally again.
Why doesn’t my remap work after clicking Apply?
A key remap not working after Apply is almost always because you have not restarted your computer yet. KeyTweak writes to HKEY_LOCAL_MACHINE\SYSTEM\CurrentControlSet\Control\Keyboard Layout, which Windows reads only when it boots. The change is in the registry the moment you click Apply, but the running Windows session continues using the old scancode table until you restart.
Steps to confirm the fix:
- Open KeyTweak and check the “Current Remappings” panel — is your remap listed there? If yes, Apply worked correctly. If not, try applying again.
- If the remap is listed, restart your computer completely (Restart, not Shut Down then Power On — a cold boot may not reload the registry correctly on all systems).
- After restarting, test the key. If it still does not work, open KeyTweak again and verify the remap is still listed in Current Remappings (it should persist).
A second possible cause: if you are running KeyTweak as a standard user (not administrator), the registry write may silently fail. Confirm that you are launching KeyTweak with administrator rights — right-click the icon and choose “Run as administrator” if unsure.
Pro tip: You can verify the remap was written correctly by opening the Windows Registry Editor (regedit) and navigating to HKEY_LOCAL_MACHINE\SYSTEM\CurrentControlSet\Control\Keyboard Layout. Look for a value named “Scancode Map.” If it exists with content, the remap was written successfully.
How do I undo a key remap in KeyTweak?
There are two ways to undo a remap in KeyTweak, depending on how many remaps you have active. To undo your most recent change only, click the “Undo Last Remap” button in the main window, then click Apply and restart. This removes the last entry added to the Current Remappings list without touching any other active remaps.
To undo all remaps at once and return your keyboard to its default state, click “Restore All Defaults.” This clears the entire Scancode Map registry entry. After clicking Apply and restarting, your keyboard will behave exactly as it did before you made any changes in KeyTweak — all keys at their factory assignments.
- Undo one specific remap: use “Undo Last Remap” (only for the most recent)
- Remove a specific older remap: remap the key back to its original function manually
- Clear all remaps: use “Restore All Defaults”
- Always click Apply and restart after any undo operation
Pro tip: If you need to undo a specific remap that is not the most recent one, just remap that key back to its original. For example, if you remapped Caps Lock to Ctrl two sessions ago, open KeyTweak, click Caps Lock in the diagram, select “Caps Lock” from the dropdown, click Remap Key, Apply, and restart.
Does KeyTweak require administrator rights?
Yes, KeyTweak requires an administrator account to apply key remaps. This is because the Scancode Map is stored in HKEY_LOCAL_MACHINE, a registry hive that requires administrator privileges to write to. Standard user accounts have read-only access to HKLM, so any remap attempt from a non-admin account will silently fail or produce an error.
The requirement is for the Apply operation — you can open and browse KeyTweak without admin rights, but clicking Apply will not work unless you are running as administrator. On Windows 10 and 11, right-click the KeyTweak shortcut and select “Run as administrator” if you are using a standard user account and UAC is enabled.
Once a remap is written to the registry, it applies to all user accounts on the machine, not just the administrator account that created it. This is because the Scancode Map in HKLM is machine-wide, not per-user.
Pro tip: If you regularly need to adjust your keyboard mapping, you can set KeyTweak to always run as administrator. Right-click the shortcut, choose Properties, go to the Compatibility tab, and check “Run this program as an administrator.” Windows will prompt for confirmation each time rather than silently failing.
Does KeyTweak work offline?
Yes, KeyTweak works entirely offline. The application does not connect to the internet for any purpose — no update checks, no telemetry, no license validation, no cloud features. Once downloaded and installed, KeyTweak functions without any network connection, indefinitely.
This is a meaningful advantage for users in restricted network environments, corporate machines with outbound traffic policies, or anyone who prefers that desktop utilities not make network requests. The 280 KB installer is everything the software needs — there are no additional downloads triggered during installation or use.
Because KeyTweak interfaces directly with the Windows registry rather than using a background service, there is no process running between sessions that could initiate network activity. The app only runs when you open it manually.
Pro tip: KeyTweak is a great candidate for a pre-loaded USB toolkit or a software package for air-gapped machines precisely because it requires no online activation, no account, and no connection of any kind.
KeyTweak vs SharpKeys — which is better?
Both KeyTweak and SharpKeys do the same thing — write a Scancode Map to the Windows registry — but they target slightly different users. KeyTweak is better for users who want to identify keys visually through a keyboard diagram, while SharpKeys is better for users who prefer a modern-looking interface with typed key detection.
SharpKeys is a .NET application maintained on GitHub, with active development, a cleaner Windows 10/11-style UI, and a JSON-based settings format that is easier to back up and share. It also has a “Type Key” feature similar to KeyTweak’s Teach Mode. Unlike KeyTweak, SharpKeys is regularly updated and has a public issue tracker for bug reports.
KeyTweak’s advantages over SharpKeys:
- Visual numbered keyboard diagram — easier for identifying keys by position
- No .NET dependency — runs on Windows XP through Windows 11 without framework installation
- Smaller install footprint (280 KB vs SharpKeys’ ~2 MB)
- Specialty Buttons panel for media/function key remapping
- Raw map view for examining the binary Scancode Map directly
SharpKeys’ advantages over KeyTweak: modern UI, active maintenance, GitHub community, macOS-friendly JSON config format, and better documentation. For most users in 2025, SharpKeys is the more practical choice. But if you want something tiny with zero dependencies, KeyTweak still delivers.
Pro tip: Unlike AutoHotkey — another common recommendation for key remapping — both KeyTweak and SharpKeys use the hardware-level Scancode Map method, which means remaps work in every application including games, admin prompts, and locked-down environments where AutoHotkey scripts cannot run.
KeyTweak vs PowerToys Keyboard Manager — what is the difference?
PowerToys Keyboard Manager and KeyTweak both remap keys on Windows, but they use fundamentally different mechanisms. KeyTweak modifies the Windows Scancode Map in the registry, a hardware-level approach that applies before any software processes the keystroke. PowerToys Keyboard Manager uses a keyboard hook (a software-level intercept) that runs as a background process.
This difference matters in a few situations. KeyTweak’s registry approach works in UAC prompts, the Windows login screen, and inside virtual machines, because remapping happens at a lower level. PowerToys’ hook does not apply in those contexts. On the other hand, PowerToys can remap key combinations (e.g., remap Ctrl+Alt+T to something), which KeyTweak cannot do — KeyTweak only remaps individual keys, not combinations.
Practical comparison:
- KeyTweak: no background process, works at hardware level, smaller install, no ongoing maintenance
- PowerToys: modern UI, actively maintained, supports key combos, requires PowerToys suite (~50 MB)
- KeyTweak for simple single-key remaps on minimal installs
- PowerToys for combo remaps, frequent changes, and users already running PowerToys
Pro tip: You cannot run both at the same time effectively — PowerToys’ hook and KeyTweak’s registry remap will conflict if you remap the same key in both. Pick one method and stick with it. If you only need to disable Caps Lock or swap two keys, KeyTweak is sufficient and adds no ongoing overhead.
How do I update KeyTweak to the latest version?
KeyTweak version 2.3.0 is the current and final release. The software has not been updated since 2009, and no newer version exists. There is nothing to update — if you have version 2.3.0 installed, you have the latest version.
This is not a problem in practice. KeyTweak works by writing a standard Windows registry value that has not changed since Windows NT 4.0. The mechanism it uses is fully supported on Windows 11 with no modifications needed. The software does exactly what it was designed to do, and there are no known bugs that require patching.
To check which version you have installed, open KeyTweak and go to Help > About, or check the file properties of KeyTweak.exe in your Program Files folder. If it shows version 2.3.0, you are on the latest release.
KeyTweak does not have an auto-update feature, which is consistent with its offline, no-network-access design. If a new version were ever released, you would need to download and install it manually from the same source.
Pro tip: If you want a tool that receives active updates and has a public development roadmap, consider SharpKeys on GitHub — it is the closest modern equivalent to KeyTweak and is actively maintained.
Does KeyTweak work on Mac or Linux?
No, KeyTweak is a Windows-only application. It is a Win32 executable that writes to the Windows registry, a mechanism that does not exist on macOS or Linux. There is no Mac version, no Linux port, and no cross-platform edition.
For macOS, the equivalent tools are Karabiner-Elements (free, open-source, highly capable) for general remapping, or the built-in Modifier Keys panel in System Preferences for simple swaps like Caps Lock to Control. macOS also allows key remapping at the system level through the hidutil command-line tool.
On Linux, key remapping is handled through xmodmap or setxkbmap for X11 sessions, or through the keyboard configuration in your desktop environment settings (GNOME Tweaks on Ubuntu, for example). The keyd daemon is a popular modern option for system-wide remapping that works regardless of the desktop environment.
Pro tip: On Windows specifically, all three of KeyTweak, SharpKeys, and PowerToys Keyboard Manager are free and do not require any payment. If you are setting up a multi-OS environment and need consistent key remaps across platforms, AutoHotkey (Windows), Karabiner-Elements (Mac), and keyd (Linux) are the best comparable cross-platform set of tools.
For Windows-specific setup help, see our Getting Started guide.
How do I uninstall KeyTweak completely?
Uninstalling KeyTweak is a two-step process: remove the application files, then remove any active key remaps. If you skip step two, your keyboard remappings will remain active even after the app is gone — because they are stored in the registry, not in the application itself.
- Remove remaps first: Open KeyTweak, click “Restore All Defaults,” then click Apply. This clears the Scancode Map from the registry. Restart your computer — your keyboard is now back to factory defaults.
- Uninstall the app: Go to Windows Settings > Apps > Installed Apps (or Control Panel > Programs and Features on older Windows). Find KeyTweak in the list and click Uninstall. The uninstaller removes the program files and Start Menu entry.
If you want to remove the registry entry manually (e.g., if you already uninstalled KeyTweak without clearing remaps first), open the Registry Editor (regedit.exe), navigate to HKEY_LOCAL_MACHINE\SYSTEM\CurrentControlSet\Control\Keyboard Layout, and delete the “Scancode Map” value. Restart, and your keyboard is back to normal.
Pro tip: You can also install SharpKeys temporarily just to clear the Scancode Map if you no longer have KeyTweak — it reads and writes the same registry value. Click “Clear All” in SharpKeys and write to the registry, then restart.
Can KeyTweak remap function keys (F1-F12)?
Yes, KeyTweak can remap function keys F1 through F12 to any other key on your keyboard. They appear in the top row of the virtual keyboard diagram. Click any Fn key to select it, then choose the target from the dropdown. You can swap F1 with another function key, map F12 to Print Screen, reassign unused function keys to more frequently needed keys, or disable Fn keys you never press.
Common function key remaps include mapping F12 to Print Screen (for keyboards where Print Screen is hard to reach), remapping F1 to disable it from triggering browser help dialogs, and reassigning the entire F-row for application-specific workflows like video editing hotkeys.
For keyboards with a hardware Fn layer (where Fn+F1 controls media, Fn+F5 controls brightness, etc.), KeyTweak remaps the base F-key, not the Fn combination. The Fn layer itself is handled by keyboard firmware, not Windows, and KeyTweak cannot reach it.
Pro tip: If you want to remap Fn key combinations or create application-specific function key behavior, AutoHotkey is the right tool — it operates at the application-intercept level and can handle any key combination. KeyTweak only does physical key-to-key swaps.
See the full features list for what KeyTweak supports, including media key remapping through the Specialty Buttons panel.
Where can I find the official download for KeyTweak?
The official and safest download source for KeyTweak is the Download section on this page, which links directly to the BleepingComputer download mirror — one of the longest-running and most trusted Windows software repositories. The file is KeyTweak_install.exe, version 2.3.0, at 280 KB.
KeyTweak is also available on Softpedia, MajorGeeks, Uptodown, and Snapfiles — all reputable hosts. Avoid downloading from unfamiliar sites that bundle installers with adware or show multiple “Download” buttons that lead to unrelated software. The real KeyTweak installer is a single small EXE file, not a download manager or wrapper.
Things to verify when downloading:
- Filename should be exactly:
KeyTweak_install.exe - File size should be approximately 280 KB
- Version should be 2.3.0 (the only released version)
- No bundled software or additional installer steps beyond the two-screen setup
Pro tip: The original developer’s page is at keytweak.net, which still serves the software. BleepingComputer’s mirror has been consistently available since 2009 and is scanned regularly for integrity.
How do I fix KeyTweak not working or crashing on startup?
If KeyTweak crashes or fails to open, the most common causes are a corrupted installation, missing Visual C++ runtime files, or a permission issue. Start with the simplest fix and work down the list.
- Run as administrator: Right-click the KeyTweak shortcut and select “Run as administrator.” If this fixes the crash, set it to always run as admin via the Compatibility tab in Properties.
- Reinstall KeyTweak: Uninstall through Apps > Installed Apps, then download a fresh copy from the Download section and reinstall. This fixes most corruption issues.
- Check Windows Event Viewer: If it still crashes, open Event Viewer (eventvwr.msc), navigate to Windows Logs > Application, and look for an error entry with KeyTweak as the source. The error code points to the specific cause.
- Compatibility mode: Right-click the shortcut, go to Properties > Compatibility, and enable “Run this program in compatibility mode for Windows 7.” Some Windows 11 builds have occasionally flagged 2009-era applications with compatibility issues.
- Antivirus exclusion: Add KeyTweak’s installation folder (
C:\Program Files\KeyTweak\) to your antivirus exclusion list. Some aggressive AV products terminate processes that modify HKLM.
Pro tip: If none of the above work, SharpKeys is a direct functional equivalent with an actively maintained codebase — switch to it rather than spending more time debugging a 2009 application. It reads and writes the same registry key and works identically on Windows 11.